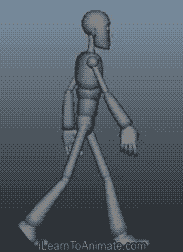
 In this post, I'm going to walk you through how I create a realistic walk cycle 3D animation by applying the principles of animation in the most effective way.
I have been using this method when I started learning animation to create my walk cycle animation in Maya. Until now, I am able to apply this technique in my walk cycle and any other character animation even when I use other software such as Cinema 4D or 3DS Max.
And in this case study, I'm going to show you exactly how I break down walk cycle animation using this method, step by step.
Read on to learn how...
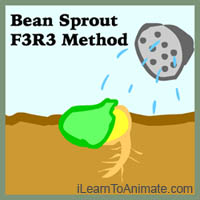
The Bean Sprout F3R3 Method: (An effective 3d walk cycle animation sequence for beginners)
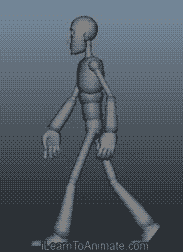
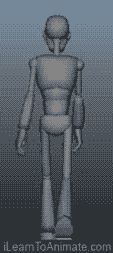
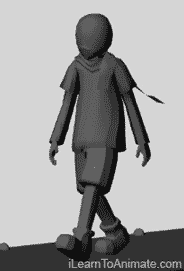
This is the walk cycle animation I created from scratch in Maya within 2 hours. I used Norman Rig for this walk cycle which is easy and free for beginners to practice.
What I love about this approach is that beginners would not feel intimidated by what is needed to complete a 3d walk cycle. Walk cycle can be done segment by segment and building on top of what is been done previously.

Tommy's First Walk Cycle Front View
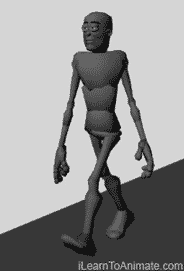
Tommy's First Walk Cycle Perspective
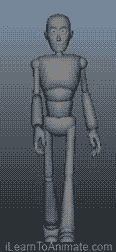
My student, Tommy, used this method while creating his first 3d walk cycle and this is what he had achieved.
On top of the method, added some fun personalities to his walk cycle by exaggerating the shoulders and arms.
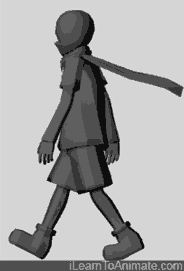
Tommy's Second Walk Cycle Side View
Tommy's Second Walk Cycle Perspective View
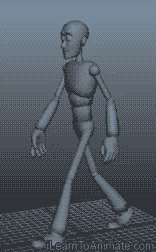
Subsequently, Tommy, modelled his own 3D character and created another walk cycle animation using the similar method and this is how it looks like.
This round, Tommy made his character looks cool by slowing down his walk cycle animation timing.
Sharing Is Caring! Click And Share!
Bean Sprout Method
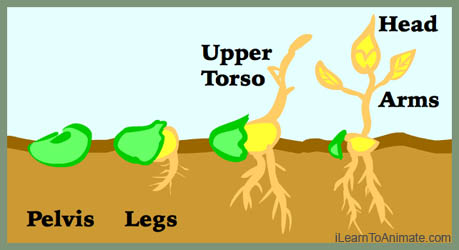 Animating a character is similar to how a bean grows. We start with the bean and we see it grows its root, followed by the stem and leaves. Character animation begins animating from the pelvis, followed by the legs, then the upper torso and finally the head and arms. Hence we animate in the following 5 sequence:
A. Pelvis
B. Legs
C. Upper Torso
D. Head
E. Arms
The main reason for this breakdown sequence is because bulk of humans weight is on the pelvis. When pelvis is animated correctly, the remaining body parts will follow through nicely. Pelvis is the centre of gravity and thus, balancing motion greatly depends on the position of pelvis.
The F3R3 Sequence Method
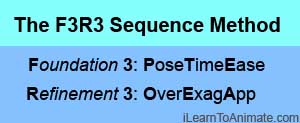 Growing a bean needs good foundation such as soil and constant watering and sunlight. Thus we apply simplified version of principle of animation using the Foundation 3 and the Refinement 3 sequence (F3R3 Sequence).
F3 sequence is PoseTimeEase:
- Pose the main keyframes in walk cycle
- Time and space the key frames
- Add in forces by Ease in and out
R3 sequence is OverExagApp:
- Add Overlapping action if applicable
- Exaggerate when actions aint obvious
- Correct any action to look Appealing
Note: The other 6 principles of animation are not included in this walk cycle, which I'll talk about it later in this post.
Now with Bean Sprout F3R3 Method in mind, let's jump straight into the walk cycle animation in 3D.
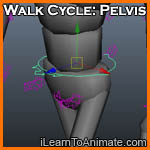 A. Pelvis

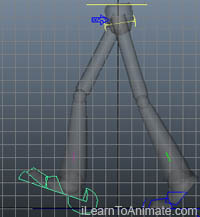
Richard Williams Animator's Survival Kit walk cycle reference
Start by animating the key poses for pelvis with the walk cycle reference from Richard William. This reference is half of the 8 frame basic walk cycle animation. Here is where we apply animation principle, pose to pose. Key poses are mainly poses that start, end or change a motion.
With reference from Richard William's Animator's Survival Kit, a walk cycle consist of 4 main key poses. The key poses are contact, down, passing, up and finally back to contact. We start with contact pose because this pose is easier to define the moment that the character starts walking. We will only be animating the Y axis of the pelvis since this walking cycle will be walking on the spot exercise.
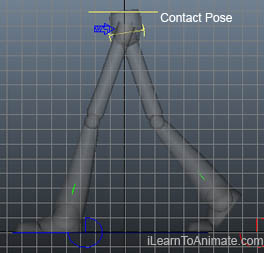
A1. Pelvis's Contact Pose
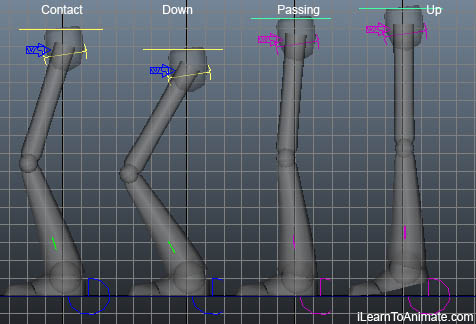 At contact pose, the pelvis is slightly lower than its default standing position. This is the pose where the feet are at furthest distance from each other. We can use the knee angle as a gauge for this pose. The knees should be bend at approximately 15-20 degree when the pelvis is at contact pose. I am not expecting anyone to measure the angle, as long as it is slight bend, it should be good enough.
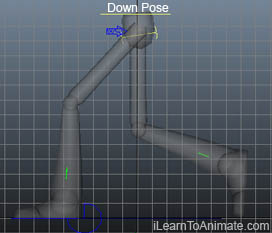
A1. Pelvis's Down Pose
At down pose, the pelvis will go even lower than the pelvis at contact pose. This is the pose when the pelvis is at the lowest point of the entire walk cycle. At this moment, the legs are meant to catch the pelvis weight. Thus, the knees are bend at about 70-80 degree to dampen the dropping weight of the pelvis.
A1. Pelvis's Passing Pose
Passing pose is when the pelvis recovers to its default height, that is when the character is standing straight. Passing pose is also refers to one of the leg passing by the other while stepping forward, thus the name passing.
Tip: In 3D, even if the character is standing straight, the pelvis is lowered slightly to allow the legs to be negligibly bend. This is able to overcome a common 'knee popping' issue while animating legs. The height to lower the pelvis will be at the point when the legs just started to bend.
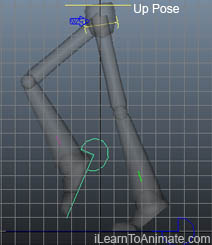
A1. Pelvis's Up Pose
At up pose, the pelvis is being pushed up and forward. Walk cycle is a continuous natural motion of a humanoid trying to make himself fall forward by putting himself off balance. Although in real life we are moving forward, for this walk cycle on the spot we only lift the pelvis along the Y axis. The pelvis is lifted to the point where the legs is seen as tiptoeing. The pelvis can pull as high as when the toe is almost lifting off the ground.
A1. Pelvis's Pose Completed
Complete the 1 step walk cycle by copying the first key frame and paste it after the fourth key frame. Once the pelvis is animated, it will be moving up and down on its own. There is no timing specified so the movement could be abrupt or slow. Nonetheless, we have gotten the keyframe that we need, we can now move on to the timing and spacing.
A2. Pelvis's Timing and Spacing

We next apply timing and spacing to our pelvis by giving some inbetween frames between each keyframe we did previously. Inbetweens are frames between key poses. In 3D context, these frames are generated by the software to expedite our animation process. We can add and reduce the number of inbetweens by selecting a key pose and shifting it forward or back.
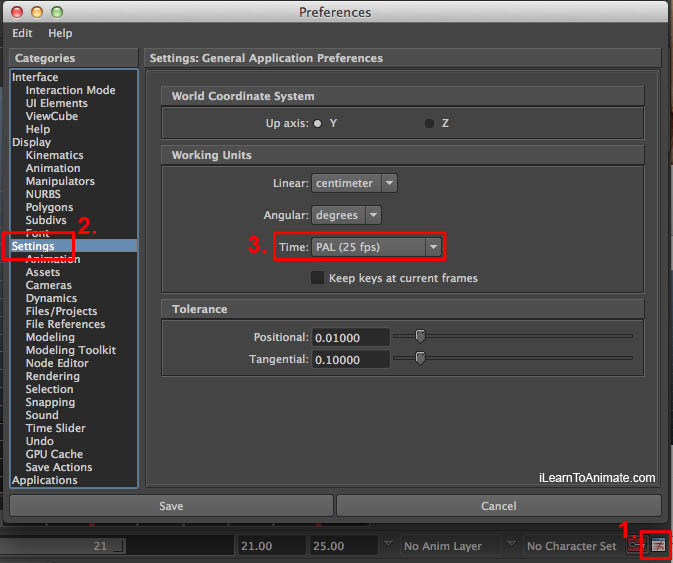
As this is a basic walk cycle, we will aim to walk the character with a normal speed of 1.5 seconds to take 2 steps. Drag the keyframes away from the previous keyframe, leaving 4 empty frames between each key poses. This will give us a 2 step walk cycle oscillation at about 1.5 seconds, based on 25 frames per second(fps).
FPS settings can be set in Maya by clicking on:
- Animation Preference
- Settings
- Working Unit -> Time: Pal (25 fps)
Feel free to adjust the inbetweens at this junction to increase or decrease your walking speed to your liking. However, be sure to have consistent inbetweens among these 5 key frames. For example, if there are 7 empty frames between contact pose and down pose, there should be 7 empty frames between down pose and passing pose as well.
Sharing Is Caring! Click And Share!
A2. Pelvis's Timing and Spacing Completed
Once this timing is set, we will not change it anymore. Changing this timing at a later stage will create lots of amendments in other areas as well. We now move on to the easing in and out.
A3. Pelvis's Ease in and out
We create a sense of force for our pelvis by applying easing in and out. The contact pose is when our pelvis is dropping due to gravity. However, our legs will slow down the pelvis dropping speed, thus resulting in easing in (deceleration). Easing in and out is created using graph editor. A steep graph will indicate a fast speed while a gentle graph will indicate a slow speed.
When graph changes from steep to gentle, the speed is dropping from fast to slow and this means deceleration.
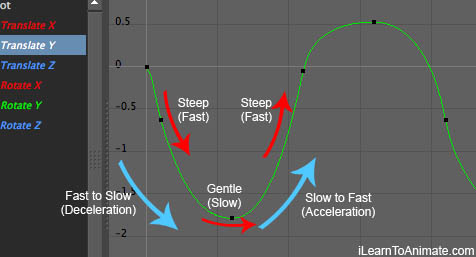
Once the dropping motion of pelvis is stopped by the leg, the leg will start to push the pelvis up gradually, thus easing out (acceleration). When the graph changes from a gentle to steep, it means the speed is picking up from slow to fast, thus acceleration.
As the pelvis is being pushed up, gravity pulls it down gradually. This results in an easing in motion, changing the pelvis speed from fast to slow. The graph for deceleration will changes from steep to gentle slope.
Eventually the pelvis drops down due to gravity pulling. Since the pelvis needs to come to a stop, the speed will pick up again from slow to fast. In the graph, the slope is changing from a gentle slope to a steep slope.
A3. Pelvis's Easing In and Out Completed
At this stage, we have build a solid foundation for our walk cycle. This is crucial because the remaining animation will rely very much on the movement and timing of the pelvis. Other principles are not applicable for pelvis except for appeal, which I'll cover at the later stage. We will proceed on to the legs animation.
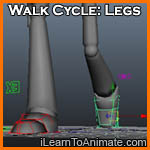 B. Legs
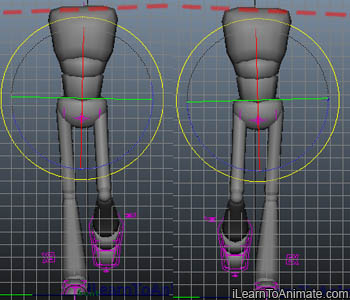
Begin the legs animation by posing them at the four key poses based on our reference. In 3D legs are controlled by inverse kinematics (IK). That means when we move the feet around, the connecting components of thigh and calf will follow accordingly.
B2. Legs' timing
Legs are posed at the respective timing of our pelvis key poses. Effectively, we will be applying two principles in one shot.
 B1. Legs' Contact Pose
Contact pose is when both legs are at the furthest point in front and behind the body. Based on the pelvis height, shift the front leg (Left) forward until the knee is almost straight. Shift the other leg (Right) to the back, with heels lifted off the floor and the knee is gently bent. I will not be pointing the front feet up at contact pose as I find it much exaggerated for a basic walk cycle in 3D.
Note: At all circumstances when the knees is straightened, we avoid a fully stretched knee at all times to prevent common "knee popping" issue.
 B1. Legs' Down Pose
At down pose, the legs act as a spring and dampens the body weight. This is when both the knees are bent to create that springy look to slow down the dropping speed of the pelvis. The both legs are shifted slightly to the back. The front feet (L) falls flat on the floor while the feet behind (R) had its heel lifted, leaving the sole on the ground.
 B1. Legs' Passing Pose
The body is pushed up by the legs at the passing pose. Since the body is raising, it means the forces acting on the legs are lesser. This means one of the leg is able to temporarily hold the weight of the body while the other leg takes the opportunity to swing to the front. Thus, the name passing pose. The front feet (L) is now directly under the pelvis to fully support it. The leg behind (R) shifts forward with the knees bend and feet pointing to the ground.
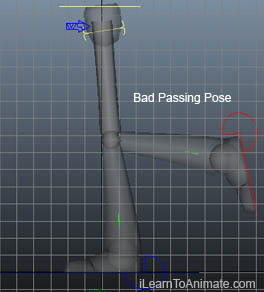
Legs' Appeal Note: It is best not to have the passing leg to be hidden behind the standing leg. Because of the silhouette created when posed in this way, it is not visually pleasing as it is hard to tell which leg is which.
 B1. Legs' Up Pose
At up pose, legs pushes the pelvis up and forward, causing the entire body to look as if it is falling forward. Lift the heel of the leg on the floor (L), leaving it standing on its sole. Then, shift the feet (L) behind until the knee is almost straight. Shift the passing leg (R) forward and lower it nearer to the ground but not landing yet.
B3. Legs' Ease In and Out
This walk cycle is a smooth transition action, so take note to make sure the motion is smooth without interruption.
Since this walk cycle is done in 3D, the software will create a basic interpretation between key poses.
I am not kidding you when I say I did not touch the graph editor to create any easing. Once my key poses are in place, the walk cycle is by default smooth.
Here graph below shows what the software Maya did for me automatically.
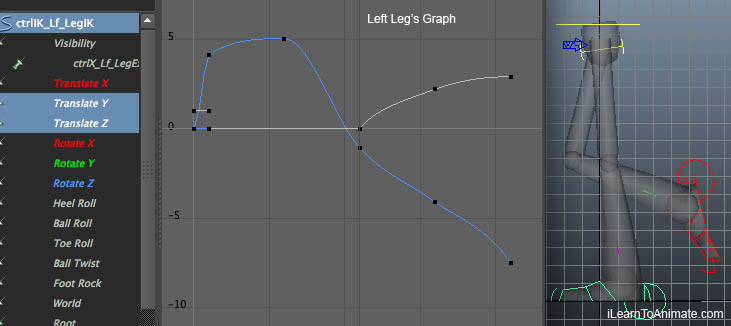
Left Leg's Graph Editor
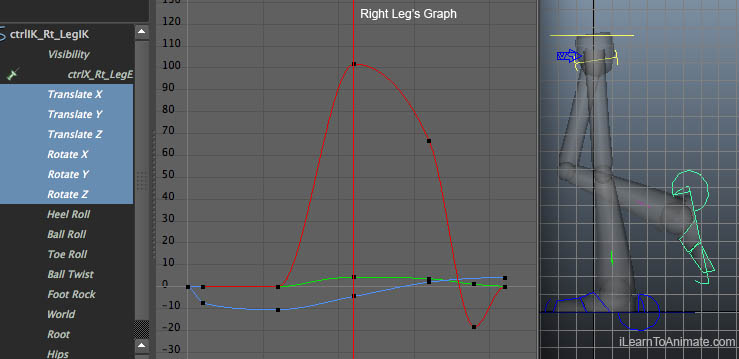
Right Leg Graph Editor
No matter which software you are using, as long as the animation looks smooth, it is not necessary to edit the graph editor at this point of time. In case your animation does not looks smooth, try to look at the graph editor and adjust it to look close to what I did.
B5. B6. Legs' Exaggeration and Appeal
The feet and toes can be slightly exaggerated to improve the fluidity of the walk cycle.
B6. Feet
Remember that we did not point the feet up at contact pose? I make up for it by pointing the feet up at about 2-3 frames before the feet lands. This provides a brief silhouette that the feet is swing to the front before landing.
Toe drag when leg is lifting up
Toe drag when leg passes the other leg
B6. Toe Drag
Toe is seen pointing back when the leg it moving forward to take a step. Technically, we do not see this in real life walk cycle unless we are wearing a pair of flippers. However, as the leg movement to the front is fast, our eyes might not be able to catch it. Hence, adding this slight bend of the toe arcing back creates a nice movement illusion.
Toe flick up before landing on contact pose
B6. Toe Flick
Before we land our feet on the ground, the toe is flick up for a 1-2 frames before landing. Again, this may not be obvious in a real walk cycle, inserting this toe flicking up for a brief moment improves the overall feet movement.
B. Legs Completed
With pelvis and legs completed at this stage, the foundation of the walk cycle should be set. There will be additional improvement in terms of appeal along the way. Take a moment to review what has been created and see if you would like to improve based on what I've done. If everything looks good to you at this stage, it's time to move on to the upper torso animation.
Sharing Is Caring! Click And Share!
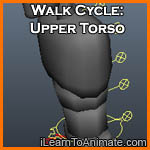 C. Upper Torso
Upper torso leans forward and bends according to the changing direction of the pelvis. Upper torso movement is considered overlapping action, which means its movement is slightly slower than the movement of the pelvis. Upper torso's movement is controlled by rotating forward and back.
C2. Upper Torso's Timing
Upper Torso's key poses will follow closely to the 4 key poses we have created for pelvis. This is to establish the basic framework for the torso before refining. However, we will refine our timing later on as we apply overlapping actions.
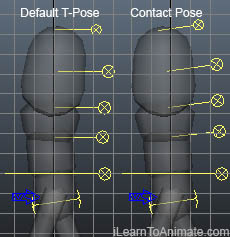 C1. Upper Torso's Contact Pose
At contact pose, upper torso will have a default pose of leaning slightly forward. This is to create an imbalance pose for the body to drop forward. Rotate the waist, abdomen and chest slightly forward individually. As the waist is linked to the abdomen and chest, avoid rotating the waist too much as it will make the chest looks hunching. Overall, the upper torso should look flat with a slight leaning to the front.
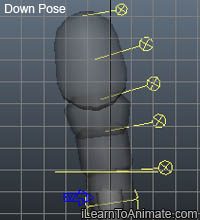 C1. Upper Torso's Down Pose
Upper Torso will lean forward more as the pelvis stopped its dropping motion. Upper torso will lean forward because our body is slightly elastic and cannot stop at the same time as our pelvis. Rotate the waist, abdomen and chest for another 5-10 degree forward. There is no hard and fast rule on how much to rotate. 5-10 degree is a rough guide to achieve what I've created.
C1. Upper Torso's Passing Pose
At passing pose, the upper torso will recover back to its default pose just like contact pose. This is a natural motion because it will be very tiring to walk with our body hunched forward while walking. Rotate the waist, abdomen and chest back to the same angle as it is during contact pose.
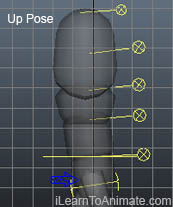 C1. Upper Torso's Up Pose
Up pose is when pelvis drops, so upper torso follows behind and leans slightly back compared to contact pose. Again, our body is always being 'dragged' by our pelvis, thus the torso will be seen following after the movement of the pelvis. Rotate the waist, abdomen and chest back by 5-10 degree with reference to our default contact pose angle.
C3. Upper Torso's Ease In and Out
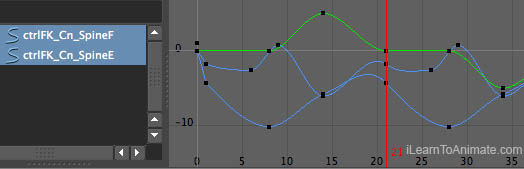
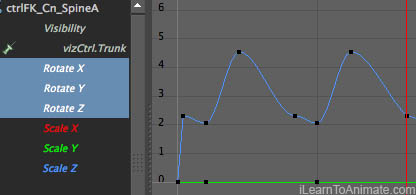 Upper torso moves in a smooth motion and it's default ease in and out is sufficient. As there is no abrupt change of speed for the upper torso movement, it is not necessary to add in ease in and out using graph editor. By default, the 3D software should create a simple spline curve for the upper torso animation. In case your graph does not looks smooth, this is how my graph editor looks like once I create my key poses for my upper torso.
C4. Upper Torso's Overlapping Action
Upper torso is divided into waist, abdomen and chest which can be rotated one after another. Adding overlapping action for upper torso creates a much natural movement. Once overlapping action is added, the upper torso will move asynchronously.

With the existing key poses, first delay the key poses of the waist by 2-4 frames after the key pose of the pelvis. Then, delay the key poses of the abdomen even later than the waist by another 2-4 frames. The same applies to the chest. When completed, the 3 components should have a staggered key poses over the time.
C6. Torso's Appeal - Cross Pelvis Shoulder Rotation (Top View)
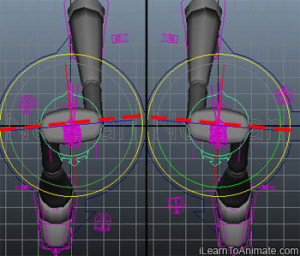
Pelvis's Rotatation
Looking from top view, pelvis slant diagonally at contact pose while shoulder are slanted in the opposite direction. Naturally, when human stretch their leg forward, the hips will rotate forward slightly. On the contrary, the shoulders will rotate but in the opposite direction so as to gain a better balance stance.
From top view panel, rotate the pelvis about 2-5 degree towards the leg that steps forward in the contact pose. It is not necessary to exaggerate this rotation as we are trying to achieve a more natural walk cycle.
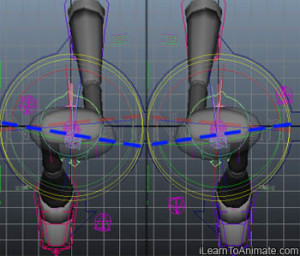
Shoulder's Rotation
Next, select the chest from top view and rotate in the counter direction of the pelvis for about 2-5 degree.
At passing pose, rotate both pelvis and shoulders back to their original angle. Repeat this rotation accordingly for the next step.
C6. Torso's Appeal - Contradict Tilting Pelvis Shoulders (Front View)
 During passing pose, the pelvis tilts down briefly while the shoulders tilt in the opposite direction. While we are standing on one leg, the pelvis is pivoted on the standing leg and tilts down on the other leg. Our shoulders counterbalance the entire body by tilting in the opposite direction of the pelvis.
Start by setting a keyframe for the leveled pelvis and shoulder at contact pose. Rotate the pelvis about 2-5 degree towards the lifting leg at passing pose. Rotate the shoulder in the counter direction for about 2-5 degree as well. Finally, leveled the pelvis back to 0 degree on the next contact pose. Repeat the process for the next oscillation.
C. Upper Torso Done
At this stage, most of the ground work will be laid. Take a moment to review against what I've done. Your animation need not be totally similar to mine. Use this as a reference to check if your animation is moving smoothly and naturally. Once you are satisfied with your current progress, we can proceed to the remaining head animation. However, do note that if there are changes made to the pelvis or upper torso after animating the head and arm, it will be troublesome. Thus, I recommend you to correct any issues before moving on.
Sharing Is Caring! Click And Share!
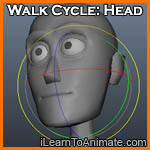 D. Head
While walking, human head nods slightly on each step. This is a very subtle movement that we don’t see ourselves. In 3D, after animating shoulders, the head will rotate as well because it is attached to the body. Hence, we have to counter the head rotation to let it looks straight ahead.
D2. Head's Timing
Again, we following the timing of the pelvis at the four main key poses. The timing will on be adjusted to create overlapping effect.
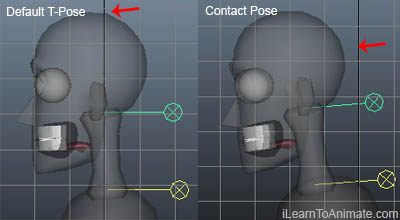 D1. Head's Contact Pose
Humans inch their head forward a little while walking. Generally, humans do not normally walk with heads straight with the spine because it can be tiring to stay in this manner. Thus, this will be the default pose of the character for walk cycle. Start with lowering our neck and head by about 1-2 degree forward.
 D1. Head's Down Pose
Head nods down briefly as character is at down pose. As the entire body goes down, naturally our head will nod because it cannot stop fast enough. Rotate the head and neck 1-2 degree further down from contact pose.
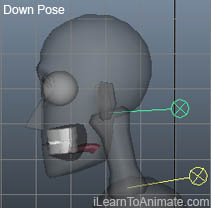
D1. Head's Passing Pose
At passing pose, the head will regain back it’s default position. Nodding of the head is for a very brief period and it rotates back to the same position as the contact pose. So, copy the key pose of the head and neck from contact pose and paste it at the passing pose.
 D1. Head's Up Pose
As the body goes up, the head tilts back a little as if being flinged up. This happens when our head is, again, unable to stop in time when our body changes direction. In this case, our body is going down after the up pose. Rotate the head and neck back by 1-2 degree to create a brief moment of rocking the head back.
D3. Head's Ease in and Out
Nothing is needed for the head’s ease in and out as the default spline curve from the key pose should be sufficient. Similar to upper torso, this walk cycle is to create a simple yet smooth motion walk cycle. As long as there the nodding is gentle and natural, we can leave it as it is.
D4. Head's Overlapping Action
Delay each head’s key pose with reference to the upper torso’s movement. Head is considered a child of the chest, hence it’s movement happens after the torso moved.

Locate the frame when the chest stops moving down at down pose. From this frame, count 2-4 frames and move the head’s down key pose to this frame. Do the same for the head’s passing, up and contact pose. This will create a natural overlapping action for the head’s movement.
D6. Head's Rotation Appeal
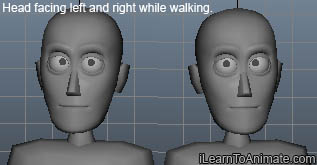 The head needs to look straight at all time. Due to twisting and turning of the upper torso, the head might be following the movement of the upper torso. This is not desirable as the head can be looking left or right unintentionally. We will need to counter rotate the head to make it look straight.
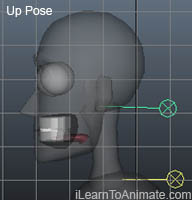
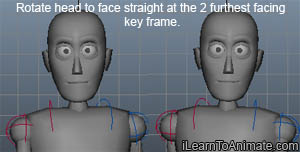 Locate the the frame where the head is looking at the furthest angle from the front. At this frame, rotate the head using 1 of the axis so that it is looking to the front. Locate the other frame where the head is looking at the opposite direction. Similarly, rotate it back so that it is looking to the front.
D6. Head's Eye Appeal
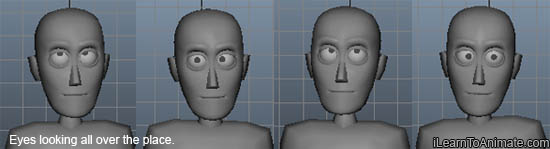 The eye of the head should also be looking straight while walking. Humans look at the far front to judge their walking direction and the place there are heading to. Depending on the rig you are using, most rigs comes with a ‘look at’ controller for the eye.
Pull the ‘look at’ target far in front of the character on frame 1. Now the character will be looking forward for the entire walk cycle.

D. Head Done
Head animation can sometimes be tricky because it is at the end of the overlapping chain. The head's movement is influenced by the pelvis and the upper torso movement. Review the entire walk cycle and check if everything is looking good before moving on to the last component.
Sharing Is Caring! Click And Share!
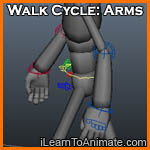 E. Arms
Arms move in the opposite direction of the leg's motion. This is to counterbalance the entire body's weight while the leg is moving. Hence, when the left leg is stepping forward, the left arm swings to the back and vice versa.
There are 3 segments for the arms animation, the upper arm, forearm and the hand. We can animate individual segment starting from the upper arm and down to the hand.
E1, E2, E3, E4. Arms' Pose, Timing, Ease In and Out, Overlapping Action
Just like all other overlapping component, we create the arms poses based on the 4 main key poses' timing. Now we are familiar with overlapping action, we can apply pose, timing, overlapping action and easing in and out at one go. Let's aim to finish one arm first before moving on to the next arm. This will serve as a reference to the next arm as well. With one arm completed, we are able to follow the values and timing accordingly to speed the process up.
E. Arms Preparation
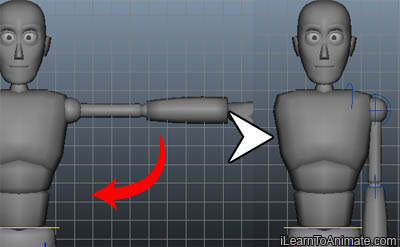
Before we animate, rotate both upper arms 90 degree from T-pose down at frame 1. This ensures the arm is placed nicely beside the body. This also helps to isolate the arm's axis while animating so that we only concentrate on one axis for the forward and backward swing.
E. Upper Arm
At contact pose, rotate the upper arm in the opposite direction of the leg. For example, if the left leg is at the front, rotate the left arm to the back for about 25 degree.
Go to the next contact pose and rotate the arm forward until it is about 35 degree infront of the body. At this contact pose, the leg should have moved to the back and so the arm will swing to the front.
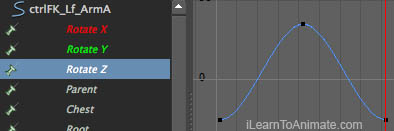 Ease in and out is done by the default spline from the key frame. Check that the swinging is smooth. If so, we can leave it as it is.
E. Forearm
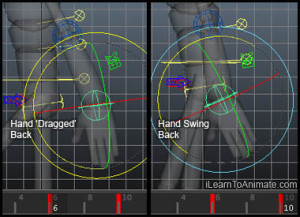
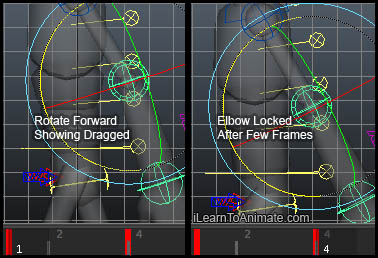 Forearm will be delayed at all poses because of overlapping action. At contact pose where the arm is swung to the back, rotate the forearm slightly forward by about 10 degree. This is to indicate the forearm is 'dragged' to the back.
At about 2-4 frames later when upper arm starts to swing forward, rotate the forearm to the back. Straightening the elbow at this stage as the forearm is dragged by upper arm and 'locked' by the elbow.
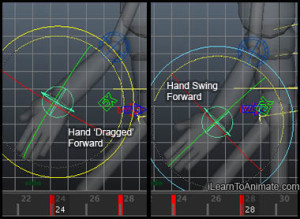
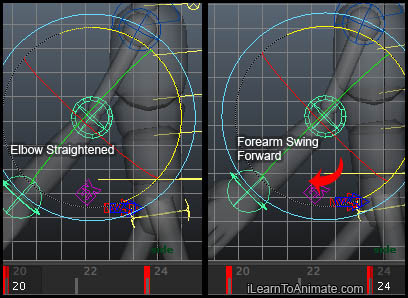 Create a keyframe for the forearm at the next contact pose when the upper arm is swung to the front. We can slightly rotate the forearm forward by about 3 degree so as to make it look natural. This is when the forearm is still 'dragged' to the front.
Again, delay for next 2-4 frames and rotate the forearm forward by about 25 degree. This delay is caused by the change in direction of the upper arm as it starts to swing backward.
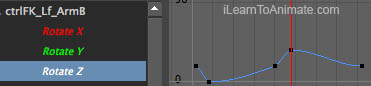
Again, no easing in the graph editor is necessary as the default spline gradient is sufficient.
E. Hand
Hand's movement is delayed slower than the forearms movement. The approach for the hand is similar to the forearm. First we locate when the forearms stops, delay for about 2-4 frames and rotate accordingly. Do the same for both the contact pose and the animation should be done.
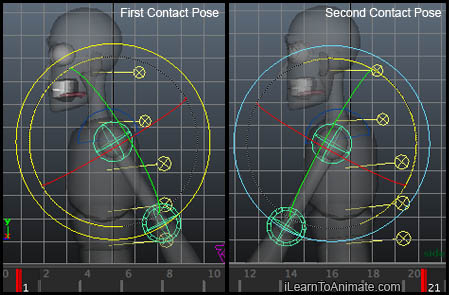
Hand's Pose And Timing At Contact 2
Hand's Pose And Timing At Contact 2
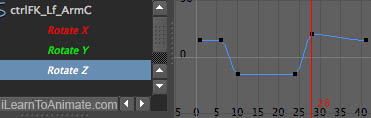
The default spline gradient is sufficient, so it is not necessary to edit the graph.
E6. Hand's Appeal
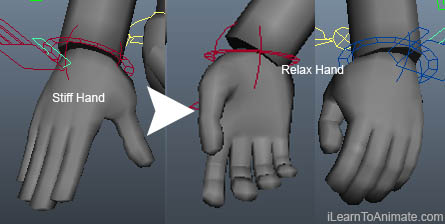 Generally, hands are usually curled up gently when we are not using our hand. Go to frame one and curl the character's hand to create a natural look. This is a one off posing because the hand will stay in this curled pose for the entire walk cycle.
Walk Cycle Done
Once the arms animation is done, the entire walk cycle is complete! Take a few moments to review your walk cycle. Although this might be your first walk cycle, it might look much better than many other beginners. Moving forward, you can consider refining other minor details such as looping, jerky movements, etc.
Sharing Is Caring! Click And Share!
FAQ
Can I animate both pelvis and legs together? Or Upper torso, head and arms together? Or even entire character at the same time?
For beginners, my recommendation is 5 components sequentially as mentioned in this post. Animators who are familiar with the sequence, feel free to animate lower torso (pelvis and legs) followed by upper torso, head and arms. For veteran animators, this could speed up their creation. For expert animators, I hope I'm not leaking too much information for beginners to learn! Animating entire character at the same time is possible when an expert animator has planned well ahead in their mind even before animating. In any case, sequence of the animation principle still applies with slight variation.
Why are the other 6 principle of animation sequences left out?
They are left out because for this walk cycle 3d animation, they are not as applicable. The principles of animation that were left out are:
Anticipation (and recovery for acting):
This refers to a preparation action before the actual execution of the motion. This motion could also refers to the recovery action after executing an action. For example, before we toss a bowling ball, we need to swing our arms to the back before we bowl. This is the anticipation action. For this walk cycle animation case study, such action is not necessary because this is a looping animation and there is no start or stop action.
Squash and Stretch (situational):
This is referring to a more cartoony visual where a character's legs or arms are stretched comically just like Disney's cartoon. Squash and stretch could also refers to an elastic material such as basketball while doing a bouncing animation. This principle is definitely not applicable in this walk cycle scenario.
Secondary actions (Acting and personality):
This refers to a habitual action that a person does unconsciously. A good example is when a person is thinking and he starts to scratch his head.
Staging (camera works) :
This refers to the subject on the screen if it is telling the story vividly. In this walk cycle, we only need to make sure the entire character is seen throughout the animation.
Especially in 3D walk cycle animation, the following principles of animation are not applicable:
Solid drawing:
This refers to the appearance of the character we are animating. As a 3D animator, most of the time we are not involved in the modeling. That's because animator's are too busy animating to do any other things! To put it nicely, we animators specialize in animating only. 😉
Arc motion:
This refers to trajectory or path of motion of a circular motion. For example, when our arms swing, our hand moves in an arc motion because of the pivot point of our arms. In 3D, a character's arm is mostly fixed and cannot be stretched unless it is rigged intentionally. So we do not really need to worry about arc motion in character animation.
I've also created a video tutorial on starting a walk cycle animation in Maya. In this post, I share more on the technical aspect of Maya and the character rig.
Use the comment box below and tell me what your think!
Sharing Is Caring! Click And Share!
